Before you start the course, please take this pre-course survey.
If you are an enrolled UCLA student, this survey helps us understand your starting point and any questions you might have. Whether you are enrolled or not, it helps you assess whether you have sufficient prior experience in Python to take the course, and/or whether you need to work through the pre-course resources before you start.
You’ll need to install two free pieces of software: GitHub Desktop and Anaconda.
GitHub
GitHub provides a way to sync code back and forth. You’ll need it to obtain and update the course code, and to submit your assignments.
1. Download and install GitHub Desktop
2. If you don’t have one already, create a (free) GitHub account
3. When you are asked what specific features you are interested in using, scroll to the bottom of the page and click on Skip personalization. (You may not see this screen; if so, jump to Step 6.)
4. In Github Desktop, on the “Welcome to Github Desktop” page, click on Skip this step

5. Enter your name and email when prompted
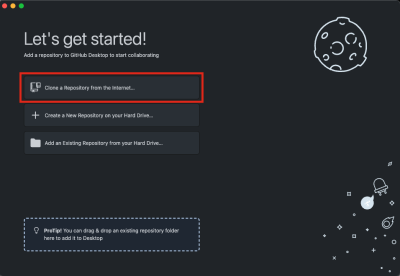
6. On the “Let’s Get Started!” page, click on Clone a Repository from the Internet

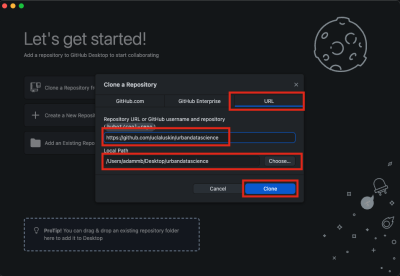
7. In the box that appears, select the option URL and enter the name of our course repository: https://github.com/uclaluskin/urbandatascience. Choose a folder on your computer where you’d like to store these files. Make sure to remember the location because you will need it later when you set up Anaconda.

8. Click on Clone. Your setup is now complete.
Whenever you want to pull the latest version of the code from the cloud, click on Fetch Origin. “Origin” is the version in the cloud.
Anaconda
We’ll use JupyterLab for this course. The easiest way to install JupyterLab, along with all of the Python libraries that we’ll be using, is through Anaconda. That helps make sure that we all have a consistent Python setup across different computers (Mac, Windows, etc.).
Your GitHub repository includes a file, environment.yml, which is a list of all the libraries that we’ll need. We’ll use it to create an environment called uds (for urban data science) – that way, the course installation won’t interfere with any other environments or Python installations on your computer.
To install Anaconda and set up your environment:
- Download and install Anaconda
- Open Anaconda Navigator (which you just installed)
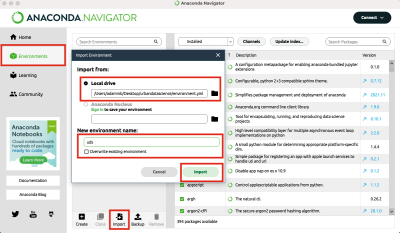
- Click on Environments (on the left sidebar)
- Click on Import (at the bottom)
- Under Local drive, navigate to the course code repository on your computer. (You downloaded this with GitHub.) Select environment.yml. Under New environment name, type uds. Then click Import. It will take 20-30 minutes to install everything.

Now, every time you want to start a new session, you can:
- Open Anaconda Navigator
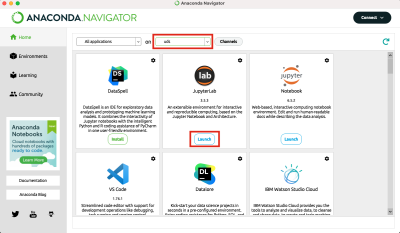
- In the top drop-down menu, choose uds (the default will probably be base)
- Under JupyterLab, click Launch

- In the navigation tree on the left, find your course repository and open one of the notebooks
You can also start a new session from the command line:
- Open the Terminal (Mac) or Anaconda Prompt (Windows)
- Type conda activate uds. This activates the correct environment.
- Type jupyter lab. This will open JupyterLab in your browser.
I recommend making a copy of the files in the course repository, and working from that copy. That means that you can fetch any updates from the cloud without overwriting any of your own work.

